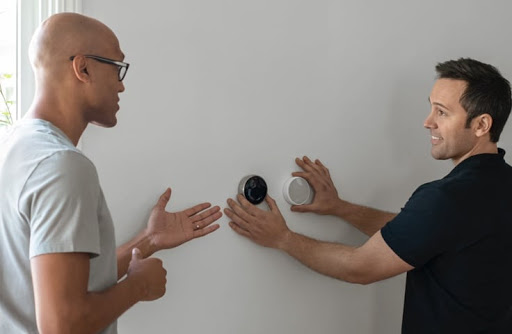
Smart thermostats have transformed the way homeowners manage indoor comfort and energy efficiency. Among the most popular options, Google Nest thermostats offer intelligent temperature control, remote access, learning capabilities, and seamless integration with modern smart home systems.
While many homeowners consider installing a Nest thermostat themselves, professional installation provides peace of mind, correct wiring, and optimal system performance from day one. Whether you’re upgrading an older thermostat or installing a Nest thermostat in a new property, understanding the professional installation process helps you make an informed decision.
In this comprehensive guide, we’ll explain everything you need to know about Google Nest professional installation, including how it works, its benefits, common installation challenges, and when hiring an experienced installer is the best choice.
What Is Google Nest Professional Installation?
Google Nest professional installation is a service performed by trained technicians who install, configure, and test your Google Nest thermostat with your home’s heating and cooling system.
Professional installation involves much more than simply mounting a thermostat on the wall. A qualified installer evaluates your HVAC system, checks wiring compatibility, installs the thermostat correctly, connects it to Wi-Fi, configures smart features, updates firmware, and verifies that every heating and cooling function operates as expected.
A complete installation typically includes:
- Removing the old thermostat
- Inspecting thermostat wiring
- Checking HVAC compatibility
- Installing the Nest thermostat base
- Connecting all wires correctly
- Mounting the display
- Configuring Wi-Fi
- Connecting the thermostat to the Google Home app
- Testing heating and cooling modes
- Calibrating temperature settings
- Demonstrating system features to the homeowner
Professional installation helps prevent wiring errors that could affect HVAC performance or shorten equipment life.
Why Google Nest Professional Installation Matters
A smart thermostat controls one of the most important systems in your home—your heating and cooling equipment. Even a small wiring mistake can lead to inaccurate temperature readings, system malfunctions, or unnecessary energy consumption.
Professional installation ensures:
Correct HVAC Compatibility
Different homes use different HVAC systems, including:
- Central air conditioning
- Heat pumps
- Furnaces
- Boilers
- Multi-zone systems
- Hybrid heating systems
An installer confirms that your Google Nest thermostat supports your specific system before installation begins.
Proper Wiring
Many installation problems occur because thermostat wires are connected incorrectly or because additional wiring, such as a C wire or power connector, is required. A professional can identify and resolve these issues safely.
Accurate Configuration
Every HVAC system has unique settings. Professional installers configure heating stages, cooling cycles, fan control, scheduling, and energy-saving features to match your home’s requirements.
Reliable Smart Home Integration
Professional setup also includes connecting your Nest thermostat with:
- Google Home
- Wi-Fi network
- Mobile devices
- Voice assistants
- Smart home routines
- Home automation systems
Benefits of Professional Nest Thermostat Installation
Hiring an experienced installer offers several advantages over a DIY approach.
1. Correct Installation the First Time
Professional technicians follow manufacturer guidelines, reducing the risk of installation errors that could affect system performance.
2. Improved Energy Efficiency
Correct thermostat placement and configuration allow the Nest thermostat to learn your schedule accurately, helping reduce unnecessary heating and cooling.
3. Better HVAC Protection
Improper wiring may damage expensive HVAC components. Professional installation minimizes this risk by ensuring every connection is made correctly.
4. Time Savings
An experienced installer can often complete the installation much faster than someone unfamiliar with thermostat wiring or HVAC systems.
5. Smart Home Optimization
Professionals configure advanced features such as:
- Home/Away Assist
- Eco Mode
- Temperature scheduling
- Remote access
- Energy reports
- Seasonal adjustments
6. Expert Troubleshooting
If compatibility issues arise during installation, a professional can quickly identify and resolve them without unnecessary delays.
Step-by-Step Google Nest Professional Installation Process
Step 1: System Inspection
The installer begins by examining your existing thermostat and HVAC equipment to verify compatibility.
They check:
- Heating system type
- Cooling system type
- Existing wiring
- Voltage requirements
- HVAC controller compatibility
Step 2: Power Shutdown
Power to the HVAC system is turned off at the circuit breaker to ensure safe installation.
Step 3: Remove Existing Thermostat
The previous thermostat is carefully removed while preserving and labeling all thermostat wires.
Step 4: Wire Inspection
Each wire is inspected for:
- Correct labeling
- Proper insulation
- Secure connections
- Wire condition
If required, the installer may recommend a C wire or Google Nest Power Connector.
Step 5: Install the Nest Base
The new thermostat base is mounted securely on the wall, ensuring it is level and firmly attached.
Step 6: Connect Wiring
Each wire is inserted into the correct terminal according to the HVAC system’s wiring configuration.
Correct wiring is critical for:
- Heating
- Cooling
- Fan control
- Emergency heat
- Heat pumps
- Multi-stage systems
Step 7: Mount the Display
The Nest thermostat display is attached to the base and powered on.
Step 8: Software Configuration
The installer configures:
- Language
- Location
- Wi-Fi connection
- Google account
- Google Home integration
- HVAC settings
- Temperature preferences
Step 9: System Testing
The installer tests every operating mode, including:
- Heating
- Cooling
- Fan
- Auto mode
- Schedule changes
- Temperature response
- App connectivity
Step 10: Homeowner Walkthrough
Before leaving, the installer explains how to:
- Adjust temperatures
- Create schedules
- Use the Google Home app
- Enable Eco Mode
- Monitor energy usage
- Troubleshoot basic issues
Tools Required
Professional installers typically use specialized tools, including:
- Screwdrivers
- Wire strippers
- Voltage tester
- Drill and wall anchors
- Level
- Electrical tape
- Labeling stickers
- Smartphone or tablet for setup
- HVAC wiring diagrams
- Google Home app
These tools help ensure a safe, accurate, and efficient installation.
Common Mistakes During DIY Installation
Although many Nest thermostats are marketed as DIY-friendly, homeowners often encounter avoidable issues.
Incorrect Wire Identification
Thermostat wires may have different labels depending on the HVAC system. Misidentifying them can prevent the system from working correctly.
Ignoring Compatibility
Not every HVAC system is compatible with every Nest thermostat model.
Skipping Power Shutdown
Working on live electrical connections increases the risk of equipment damage and personal injury.
Poor Wi-Fi Setup
A weak or unstable network can affect remote control and software updates.
Improper Thermostat Placement
Installing the thermostat near windows, direct sunlight, kitchens, or air vents can result in inaccurate temperature readings.
Incomplete Configuration
Many DIY users overlook important settings such as heating stages, fan timing, or system calibration, reducing overall efficiency.
Professional Installation vs DIY Installation
| Professional Installation | DIY Installation |
|---|---|
| Expert HVAC knowledge | Basic homeowner knowledge |
| Correct wiring verification | Higher chance of wiring errors |
| Full system testing | Limited testing |
| Smart home configuration | Manual setup |
| Faster installation | Can take several hours |
| Lower risk of HVAC issues | Greater risk of compatibility problems |
| Ongoing support | Self-troubleshooting |
While DIY installation may seem cost-effective, professional installation often prevents expensive mistakes and ensures long-term reliability.
When Should You Hire a Professional?
Professional installation is recommended if:
- You’re replacing an older thermostat.
- Your home has a heat pump or multi-stage HVAC system.
- You are unsure about thermostat wiring.
- Your system requires a C wire or power connector.
- You want the thermostat integrated with your smart home devices.
- You prefer expert setup and testing.
- You want confidence that the installation meets manufacturer recommendations.
If any of these situations apply, hiring a professional can save time and help avoid installation issues.
Frequently Asked Questions
How long does Google Nest professional installation take?
Most installations take between 30 minutes and 2 hours, depending on the complexity of the HVAC system and any wiring modifications required.
Can a Nest thermostat work without a C wire?
Some systems can operate without a C wire, while others may require one or a Google Nest Power Connector. A professional installer can determine the best solution for your HVAC setup.
Is professional installation worth it?
For many homeowners, yes. Professional installation reduces the risk of wiring errors, ensures proper configuration, and helps your thermostat perform as intended.
Can professionals connect Nest to Google Home?
Yes. Professional installation typically includes connecting the thermostat to Wi-Fi, the Google Home app, and compatible smart home devices.
Will a professional test my heating and cooling system?
A complete installation should include testing all heating, cooling, fan, and smart features to confirm everything is functioning correctly.
Conclusion
Google Nest professional installation offers more than simply mounting a smart thermostat. It ensures your HVAC system is compatible, wiring is correct, smart features are configured properly, and every function is tested for reliable performance.
While DIY installation may work for some homeowners, professional installation provides greater confidence, improved efficiency, and long-term peace of mind. With expert setup, your Nest thermostat can deliver the comfort, convenience, and energy savings it was designed to provide.
Looking for a hassle-free Google Nest thermostat installation?
Our experienced technicians provide professional installation, complete system testing, smart home integration, and personalized setup to help you get the most from your Nest thermostat. Whether you’re upgrading an existing thermostat or installing a new smart heating solution, we’re here to ensure everything works perfectly from day one.
Contact us today to schedule your professional Google Nest installation and enjoy smarter, more efficient home comfort.